What is it?
Menu items are the navigation buttons such as 'Home' and 'About Us' that you typically see on your website. The Menu Items tab provides you access to your site's navigation menu(s). Depending on your site's design, you may have one or more navigation menus. The main screen under Menu Items will display all of your navigation menu sets, and by clicking on one, you'll be shown the menu items contained within that set. From there, you can add, edit, or remove your site's navigation buttons.
How to Access
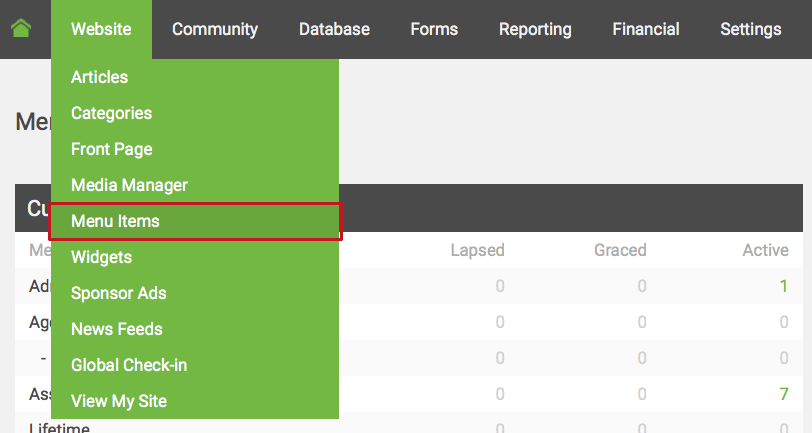
Access the Menu Items tab by navigating to Website > Menu Items.

To make changes to a specific menu, click on that menu's name from the Menu Items Manager - this will bring you to the Menu Items.

Creating a New Menu Item
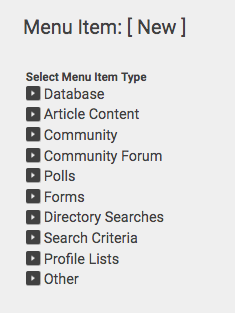
The Content Management System allows ASAs and/or Admins to create different types of Menu Items to display different site content. The types of menu items are organized into ten categories: Database, Article Content, Community, Community Forum, Polls, Forms, Directory Searches, Search Criteria, Profile Lists, and Other. NOTE: Before a new menu item is viewable on the website, the appropriate group permissions should be assigned. To assign permissions, click the Permissions button in the top toolbar of the Menu Item Manager.
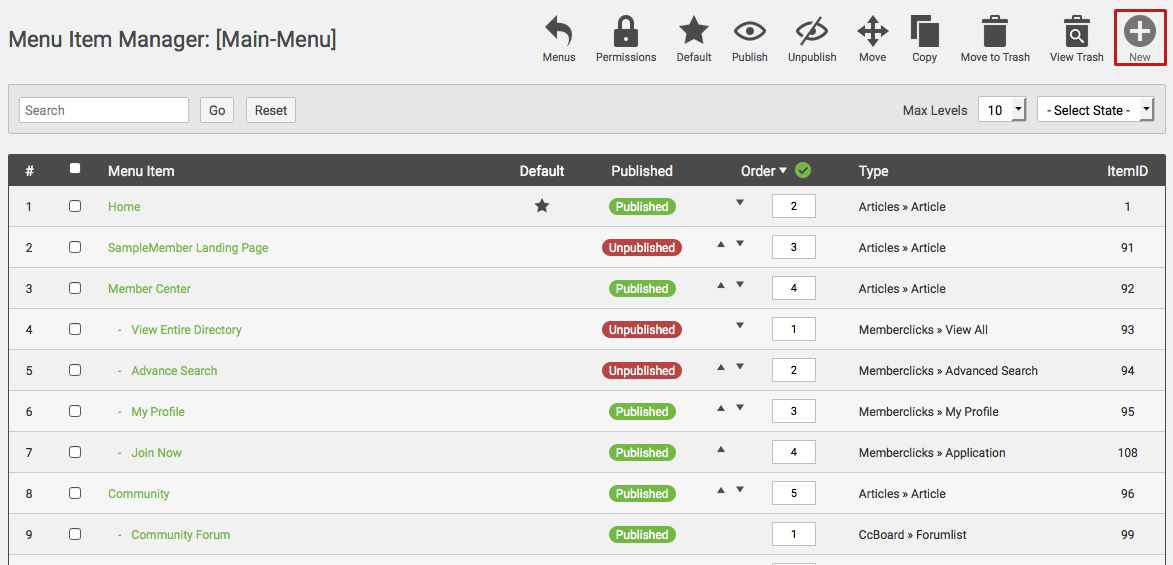
1. To create a new menu item, first navigate to Website > Menu Items and click the name of the menu set to which you want to add a new menu item. This will open and display the Menu Items within your chosen menu set. In the top right corner of page, click New.

2. Now that you have chosen to create a new menu item, you'll need to choose what type of menu item you would like to add. Clicking on any of the menu item type headings will open a list of the menu items you are able to add.

The following are descriptions of the types of menu items available organized by menu item type:
- Database: The Database category will allow you to add a menu item to direct a user to the following pages:
- My Profile: This menu item will bring the user to his or her profile page.
- View All: This menu item will bring the user to the directory where he or she will be able to see the other members in a directory listing, according to attribute security.
- Advanced Search: This menu item will bring the users to the Advanced Search page where he or she can search for other members using the Advanced Search options.
- Article Content: The Article Content category will allow you to add menu items which direct users to the following pages:
- Front Page Blog Layout: The Front Page Blog Layout will display the articles assigned to the front page. Articles can be assigned to the front page menu item by toggling the green check mark in the Front Page column of the Article Manager.
- Single Article: A Single Article menu item will display the designated article. The article which will display can be chosen in the Parameters (Basic) of this menu item.
- Category Blog Layout: The Category Blog Layout will display the intro text of articles from a designated category. The category to be displayed and layout (number of leading articles, columns, etc.) for this menu item can be configured in the Parameters (Basic) of this menu item.
- Category List Layout: The Category List Layout will display article titles from a designated category. The category and number of article titles to be displayed can be configured in the Parameters (Basic) of this menu item.
- Archived Article List: The Archived Article List will display articles in archived status, regardless of category. The order in which these articles display can be configured in the Parameters (Basic) of this menu item.
- Community: The Community category will allow you to add menu items which direct users to the following pages:
- Event Calendar: This menu item will direct users to the event calendar.
- Event List: This menu item will direct users to the event list.
- News Feeds: The news feeds menu item will direct users to a list of the site's news feeds.
- My Community: This menu item will direct users to the main Social Community page.
- Blog: This menu item will direct users to the site blog (if one is in place).
- Community Forum: The Community Forum category will allow you to add menu items which give access to three different views of the Community Forum:
- View Forum List: This menu item will direct users to the forum list, also referred to as the board index. The categories and forums which display on the Board Index will depend on the group permissions for each category and forum.
- My Posts: This menu item will direct a user to a list of his or her posts. Generally, this menu item should only be displayed to non-public users.
- Most Recent Posts: This menu item will direct a user to the most recent posts on the Community Forum.
- Polls: The Polls category allows you to create a menu item which directs users to the site's polls. NOTE: Only the site's published polls will appear in the list. To add a new poll, an administrator can navigate to the Community menu in the admin interface, click Polls, and click the new button.
- Forms: The Forms category will allow you to add a menu item which directs users to one of your online forms. Expanding this category will display a list of the active forms in your MC Professional solution. NOTE: If you do not see the form you want to link to here, navigate to Forms > Form List and edit the form to make sure it is in Published status.
- Directory Searches: Directory searches will show any directory searches that have been created within your site.
- Search Criteria: This item will allow you to add a menu item to direct users to the results of a saved search. To add a menu item which links to the results of a saved search, simply click the name of the saved search in the list.
- Profile Lists: The Profile Lists option will allow you to direct users to a page of results from a saved profile list created from the profile list area of your site.
- Other: The Other category contains up to seven types of menu items which you can add to your website. NOTE: You will only see four types of menu items unless you've purchased the additional Review Panel function. If you've purchased the Review Panel, you can read about setting it up here.
- Login/Logout: If a user is not logged into the site, then this menu item will read Login and direct users to the site's login page. If a user is already logged in, this menu item will read Logout and will log users out of the site.
- External Link: An External Link menu item will direct users to an external web address which can be specified in the Menu Item Details of this menu item.
- Forgot Password: A menu item with a link to reset a member's password will be created.
- Separator: A Separator is a menu item which cannot be clicked. This menu item type is used to organize groupings of menu items.
3. Next, give your menu item a Title. The name is the text that will show up in the menu bar on the front-end, or member side, of your site. The Menu Item's Alias will generate automatically. NOTE: Each menu item is required to have a unique alias. If you receive a message that says "The chosen alias is already in use..." add something to the alias to differentiate it (ex. instead of just community, change the alias to community-page or community-2).

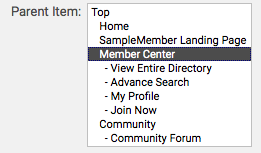
4. Choose the new Menu Item's Parent item. If Top is selected, the new menu item will appear as a completely new tab in your menu bar. Choosing an existing menu item as the Parent item will mean that the new menu item drops down or flies out as a sub-navigation item on the chosen parent Menu Item.

5. Finally, within the menu item, use the Group Access permissions on the right-hand side of the screen to assign permissions to each of the applicable groups who should be able to see this item in the menu bar.

Column Headers
-
#: An indexing number automatically assigned for ease of reference.
-
Checkbox: Check this box to select one or more items. To select all items, check the box in the column heading. After one or more boxes are checked, click a toolbar button to take an action on the selected item or items. Many toolbar actions, such as publish and unpublish, can work with multiple items.
-
Menu Item: The name of the menu item.
-
Default: Indicator of the default menu item, which serves as the website's homepage.
-
Published: Whether the item has been published or not. You can change the published state by clicking on the icon in this column.
-
Order: The order to display items. If the list is sorted by this column, you can change the order by clicking the arrows or by entering the sequential order and clicking the "save order" icon (disk icon next to "order" header). Note that the display order on certain pages are set in the "parameters - advanced" section of each menu item. If that order is set to use something other than "order" (for example, "title - alphabetical"), then the order value on this screen will be ignored. If the menu item order parameter is set to use "order", then the items will display on the page based on the order displayed on this screen.
-
Type: The menu item type for this menu item.
-
Item ID: Here you can see the ID number; you can not change this number.
Toolbar
At the top right you will see the following toolbar:

The functions are:
-
Menus: Click on this button to go to the menu manager.
-
Permissions: Click the permissions icon to set group permissions for the menu items within the current menu.
-
Default: Select a menu item which you want to be the homepage of your site, and click on this button.
-
Publish: To publish one or more items, select them and click on this button.
-
Unpublish: To unpublish one or more items, select them and click on this button.
-
Move: Select one or more items and click on this button to move them to a different menu set. A new screen will display showing the possible "move to" locations on the left and the list of item(s) being moved on the right. To complete the move, select the desired "move to" location and press the "move" button. To cancel the operation, press "cancel".
-
Copy: Select one or more items and click this button to copy them. A new screen will display showing the possible "copy to" locations on the left and the list of item(s) being copied on the right. To complete the copy, select the desired "copy to" location and press the "copy" button. To cancel the operation, press "cancel".
-
Move to Trash: Select one or more menu items and click on this button to move them to the trash. Note that menu items can be restored from the trash as long as they are not permanently deleted.
-
View Trash: View the list of items in the Menu trash.
-
New: Click on this button to create a new menu item/navigation button.
List Filters
Use the available list filters to find and sort your menu items:

-
Filter: If you have a large amount of menu items, you can use the filter option to quickly find the desired item. Enter all or part of the item title, or the ID number.
-
Max Levels: This option displays only the menu items that have x number of levels or less (where x is the number you select). The main buttons that you see in your navigation menu are "level 1"; if you mouse over one of them and see a sub-menu of additional buttons, those are "level 2"... and so on.
-
Select State: Use this option to display only the menu items that are published or unpublished.