What is it?
A table is a grid divided into rows and columns that keeps your content confined within individual cells. They're best used to organize a page's content.
How to access
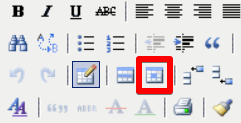
Enter an article or contact center message, place your cursor where you want to insert the table, then click the Insert/Edit Table icon, which is pictured below.

The Insert/Edit Table pop-up box will appear.
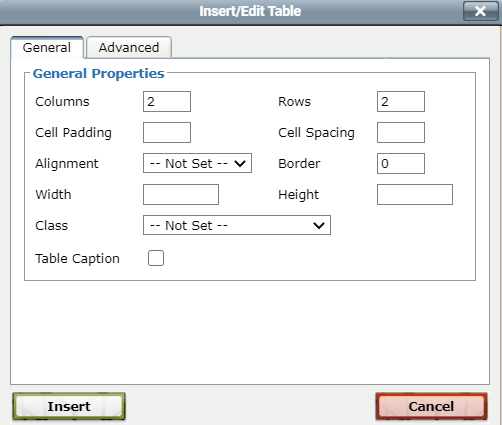
In this box, you can determine how many columns and rows the table initially possesses, how thick the table's border is by entering a number into the Border option, and also give the table a set width and height. Creating a table with set dimensions is rarely recommended and will be expounded upon further below. If you wish to create padding within each table cell so that the content does not touch the table's edges, use the cell padding option. If you want to ensure that all other content stays a certain distance from the table, use cell spacing.
Table alignment is tricky and will be discussed further below, so ignore it for now. Choose the number of columns and rows you wish your table to possess, then click the green Insert button to insert the table into your article.
Your initial table will be tiny, but worry not. The table will expand when you add content into its cells.
Table width issues
A common table issue occurs when a table is too wide to fit on an article page, or is too wide to be viewed on a screen. Tables do not wrap or limit themselves if given a set width. Your MemberClicks template's maximum width depends on which template you're using. Let's say your maximum article width is 700 pixels, which is common among MemberClicks templates. If you tell your table to be wider than 700 pixels, or place enough content in the table that it's forced to be wider than 700 pixels (multiple images stacked next to another, for example), then your table's content will be cut off once it reaches the template's maximum page width. This causes a scroll bar to appear at the bottom of the table, which must then be used to scroll over and see the rest of the table's content. There are multiple ways to combat this:
1) Ensure you don't insert items into the table that will force it to exceed your page's maximum width. Using our above example, if you insert two images that are 400 pixels wide next to one another in a table, the table will be forced to be at least 800 pixels wide, which will cause it to spill past the edge of your page.
Important note for inserting images into tables: A table will always remember an image's original size when it's first inserted into the table. If you insert an image that's 1000 pixels wide, then re-size it to be 300 pixels wide while it's inside the table, the table will still remember the image as being 1000 pixels in width. This will cause the page's text wrap to break and the table will spill past the page's edge. When you insert an image into a table, ensure it's already sized appropriately before you insert it.
2) Give the table a width of 100%. This tells the table's width to always stretch 100% of the available screen space. You can do this in the table pop-up box that is pictured above this section. Place your cursor in the Width box, then enter 100%. If your content is too large to fit on the screen, then this will not correct it, as the content's width will still cause issues. That said, if your table's content is mostly text, or your images inside it are small, this option typically ensures that the entire table will be viewable regardless of the screen on which it is viewed.
Table column width
Telling a table to be %100 is all well and good, but what if you possess a four-column table and you need all the columns to be the same width? Or perhaps just need one column to be a certain width to ensure its content is always visible? This is possible by editing a specific cell's properties.
Using a four-column table example, if you want all your columns to be equal in width, place your cursor inside the first cell in the table's first column. Next, click the button two icons to the right of the Insert/Edit Table icon, which is the Table Cell Properties icon.
A pop-up box that looks nearly identical to the Insert/Edit Table box will appear. This allows you to edit the properties of this particular cell.
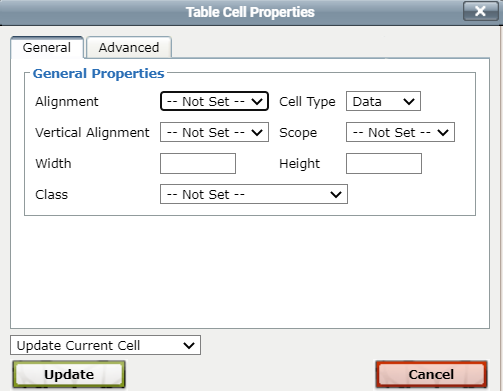
Enter 25% into the Width field. Doing so ensures this cell will be 25% of the table's width, regardless of how large or small the table is forced to be based on how it's being viewed. Also, cells in the same column cannot possess a different width, so by making the first cell in the column 25% of the table's width, all other cells in the same column will follow suit and also be 25% of the table's width. Once you've completed this process in the first column, repeat the process in the second, third, and forth column. The end result will see all of your columns take up only 1/4th of the table's width, no matter how large or small the table appears.
Adding and removing columns/rows
Once a table is created, you will not be able to edit its rows/columns through the Insert/Edit table icon. You will instead want to utilize one of six editor icons that allow you to both add and delete rows or columns. These are pictured below.
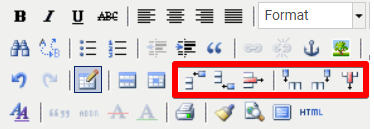
These are, in order from left to right:
1) Insert Row Before - This will insert a row before the cell that you're currently clicked in.
2) Insert Row After - This will insert a row after the cell that you're currently clicked in.
3) Delete Row - This will delete the row you're clicked in.
4) Insert Column Before - This will insert a column before the cell that you're currently clicked in.
5) Insert Column After - This will insert a column after the cell that you're currently clicked in.
6) Delete Column - This will delete the column you're clicked in.
Borderless tables
To make your table borders invisible, click the Insert/Edit Table icon, then locate the Class drop-down. Open the drop-down, then scroll to the very bottom, where the last option is (value). Choose this, and the drop-down next to Class will become a text box. Enter the word 'borderless' here and save. This will show your table borders as dotted lines on the admin page, but will remove them from view on the site.
Centering tables
Centering tables is a tricky process that must be completed through the article's HTML. You cannot tell a table to center in the same manner you can text or an image using normal editor icons. You will instead need to surround the table's HTML code with <center> tags. By placing the tag <center> before the start of the table's code, then </center> after the table's code ends, you're telling the items between your pair of center tags to align in the center of the page. While this can be intimidating if you're unused to editing an article's code, it's doable if you locate the right bits of table code.
To access an article's code, click the HTML button. This is the last button on the last row of your editor icons.
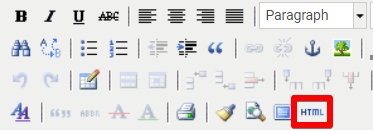
You can also click the Toggle Editor button in the lower left-hand corner of the page.
All tables will start with a line of code that begins '<table.' Ignore whatever code comes after this, it's only important we locate <table. Use your browser's 'find' function to quickly search the code for <table if you don't want to pick through all the code (this search function is Ctrl + F in many browsers). Once located, add <center> on the line before <table. This will look similar to the below.
<center>
<table border="0">
Next, locate the table's closing code tag, which signals the end of the table. This tag is </table>. Place the tag </center> after it so it looks like the below.
</table>
</center>
A live example of code that resembles the above is pictured below.
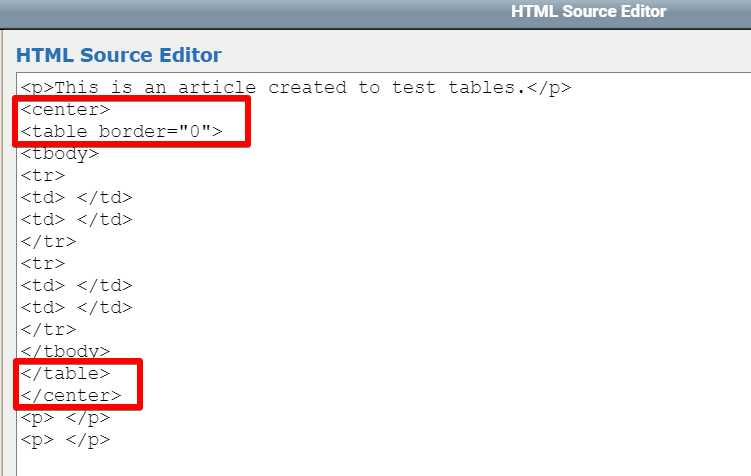
If your code resembles the tags highlighted above, your table should be centered.
Additional table functions
There are dozens of functions you can impose upon a table. Let's go over just a few popular options below.
1) To align the content of a cell in the center of the cell itself, click into the cell, then click the Table Cell Properties icon. Once here, open the Alignment drop-down and choose Center.
2) To give a table cell a background color or a border color, click on the Table Cell Properties icon, then click the Advanced tab. On the following page, you'll see two boxes exist next to the options Border Color and Background Color. If you know the hex value of the color you want, enter it in the first, rectangular box next to these options. If you want to use a color picker to determine your color, click the smaller, square box. You will then be able to select a color.
3) It's often best to avoid giving your table a set height. If you do, but don't fill the table with enough content, the bottom portion of the table will be empty, as the table won't adjust to compensate for your lack of content because it's been told to be a set height no matter what. An issue can also arise if you attempt to place too much content in a table with a set height, as the table will not expand.