What is it?
There are two methods you can utilize to insert links into an article, event, or contact center message. This guide details how to create a link using those methods.
How to Access
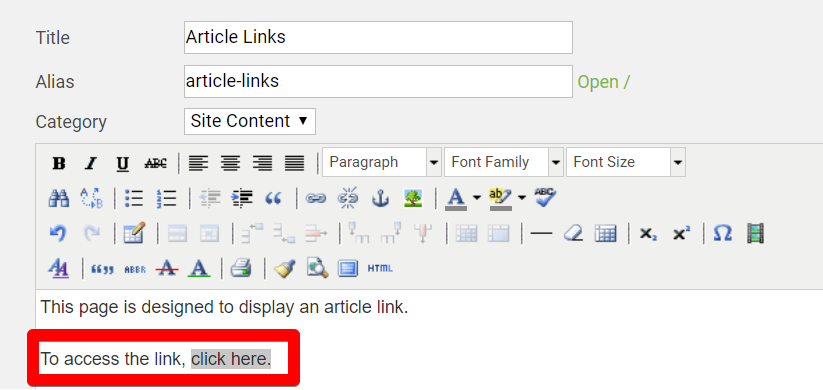
Choose to enter an article, contact center message, or any other page in which you're allowed to edit the content, such as an event. All MemberClicks pages use the same editor, so once you know how to create links in one area, you'll be able to create links in all pages. For this guide, we'll be editing an article. To do this, go to Website->Articles->click on an article to edit it, or choose to create a new one by clicking the New icon at the top of the page. Once you do, place your cursor into the body of the article page. If you want to attach a link to a specific bit of wording, such as 'Click Here,' type that into the page and highlight that wording. Once you do that, you will possess a page that looks like the screenshot below.

Once you possess the above, follow the steps below to attach a link to the highlighted words as you see fit.
Method One
To link to another item within MemberClicks, such as another article, file, or form, click on the Site Links button in the lower left-hand corner of the page while the words 'click here' are highlighted. That button is pictured below.

Once you click on this, you'll be presented with a pop-up box of options that allows you to choose from a variety of items to which you can link. This is pictured below.

- This shows all of the areas within the MC Professional platform from where you can pull in links. Choosing the Articles option will allow you to insert a link to an article, whereas choosing the Menu Item option will allow you to insert a link to a menu item, and so on and so forth. Click on the desired tab to have the option to pull in a link from that tab.
- This upload button is present if you've clicked on the File tab. The reason for this is that in order to link to a file, you must first upload it into the system. You can do this by either going to Website->Media Manager and uploading the file there, or you can click the upload button present in the screenshot, then choose the media manager folder into which you want to upload the file. Once you've uploaded a file, you will have the option to choose it for insertion.
- If you did not enter and highlight any text before you clicked the Site Links button, you can do so here to determine the clickable wording of the link.
- Once you've chosen a file and the Link Text box is filled in, you will be able to insert the link into your page.
Method Two
If you're linking to an external site or item that is not stored in MemberClicks, highlight the wording that you want the link to be attached to, then click the Insert/Edit Link icon that is pictured in the screenshot below.

Once you do, enter the link you wish to insert into the Link URL box that's presented. You must enter the full, entire link, so if you exclude the 'http' portion of a link, the system will ask you if it should be automatically added, which is needed for the link to work. Click the green Insert button to insert the link into the page.
End Result
No matter which method you utilize, you should end with a working link inside of your article.